
Optimizing a Glock 34
The following is an illustrated description of how I modified my Glock 34 for practical/dynamic shooting. The description is presented "as is" and for informational purposes only.
Somewhat less than perfect…
 As far as I am concerned, the "Glock Perfection" motto is utter crap. It is no way near perfection, and there is a number of obvious reasons why this is so. I will offer my comments on the flaws, design blunders and other errors during the description of the modifications I've done listed below. Most of the shortcomings can be overcome by some rather simple tinkering, tuning and messing around, so frankly I am totally at a loss as to why Glock doesn't finish the design and manufacturing job themselves, perform the relevant upgrades and sell a much better gun at a marginally higher price. Of course, the nice advantage of fixing the flaws and errors yourself is that you get pretty much what you want and not what Glock might think you want.
Introducing the mods
OK, now for the business part. Here is a description of the modifications I've done om my G34 and an explanation of why. There are plenty of aftermarket parts for Glock – and advice on Glock DIY gunsmithing – to be found on the Internet. Some mods are better explained than others and some parts are better justified than others, so buyer beware. The fact that you can buy parts specifically advertised for "competition tuning" such as a titanium guide rod, heavier recoil springs and a lighter trigger spring will (must!) tell you that you can't just blindly install an arbitrary advertised tuning modification in your gun and expect it to perform better.
I am not an experienced gunsmith, so I am hardly qualified to give "expert advice" – but at least I have tried to educate myself a bit on the matter to make informed choices, and I will do my very best to explain why I've done as I have. I'll also comment on the difficulty of performing the modifications and give a hint at the price tag for relevant parts.
By the way, I've listed the modifications below in the order I performed them – so they're not necessarily in prioritized order.
List of contents:
- Grip tape – frame and slide
- Front sight
- Rear sight
- Magwell
- Guide rod
- Recoil spring
- Firing pin spring
- Safety block plunger spring
- Mag release
- Trigger spring
- Trigger spring geometry
- Thinned down connector
- Firing pin spring – cut coils
- Firing pin spring alternative – thinned down
- Reduced trigger take-up
- Reduced trigger overtravel/reset
- Polishing internal parts
1) Grip Tape on Grip, Frame and Slide
The G34 has the third generation frame with riflings on the front and rear of the grip, 3 finger grooves and "thumb indentations" on the sides. My first impression of the gun was, that the polymer grip was about as ergonomic as a 1-by-2" pole of unplaned pine wood, which is to say "not very much". At first this may appear to pose a problem since the grip is an integrated part of the frame, so you can't simply replace grip plates like on a 1911 style gun. I found that simply covering the sides of the grip with grip tape and wrapping the grip with 3 strips of grip tape (approx 1cm wide) helps tremendously. I use deck-tread adhesive traction tape (similar to skate board tape) originally intended for boats. I wrap between the finger grooves so their profile is "mellowed out".
 |
 |
The effect of the mod is very significant and quite dramatic. It's now actually quite comfortable to hold 🙂 I wrapped the gun on my very first trip to the range and it was "instant relief". The tape has held up good for quite some time – I think by now I've re-wrapped it a few times. I still use cheap 5 USD (30 DKK) no-name tape but I consider giving 3M a go next time.
Fuelled by the feeling of success with this first very simple, but IMHO necessary, modification, for a while I entertained thoughts of eventually looking into a full "Mats Bäckström custom <a href="http://www.matsbackstrom.com/index_pages/ThumbRest.html">Dalmas grip</a>" treatment… but have since reconsidered.
I've also added some grip tape to the frame on the left side in front of the trigger guard where I support the frame with my left thumb. It's nice to have a rough surface to get that tactile feedback sensation to the thumb, saying that "proper" contact with the frame – and thus a proper grip – has been obtained. For a while I planned to go one step further and add a custom "gas pedal" thumb rest. I have made a preliminary first attempt at a fixed thumb rest design that fits onto the tactical rail of the G34. I went further and re-designed this fixed monoblock thumb rest into a 2-piece adjustable version that I felt could turn out to be very nice. It appeared however to present a bit of a challenge to make the profile slim enough to let me use it with my speed draw holster. I also contemplated fixing a plastic Arredondo thumb rest to the frame – but eventually abandoned the idea altogether, since I became more or less convinced that proper grip technique was the key to muzzle flip and recoil control rather than a "physical device" sticking out of the side of the gun.
I've added grip tape to the sides of the slide as well so its easier to rack the slide in a hurry when the course of fire demands it. The "Tenifer" surface treatment of the Glock slide is extremely slippery when you have wet or sweaty hands, and for some reason Glock – in their infinity wisdom – made a total design blunder and omitted front slide serrations while implementing rear slide serrations on the G34 model. What were they thinking? Oh well – It's easy to fix with some of your favourite grip tape and, hey presto, in an instant you can do that fancy "unload and show clear" trick where you rack the slide and fling the last chambered round into the air and catch it. But I digress – Unload and show clear is not a Comstock stage.
Difficulty: What? None! Just make sure to maintain a firm grip of the gun while the tape on the grip sets – or wrap it tightly with rubber shock cord or elastic bands and leave it like this for a while (a few hours). Otherwise it may come loose again.
Total time: Doesn't take long at all… 5-10 minutes to cut the tape and wrap it. And this would be going slow and spending some time on wrapping tight and consistent.
2) Front Sight
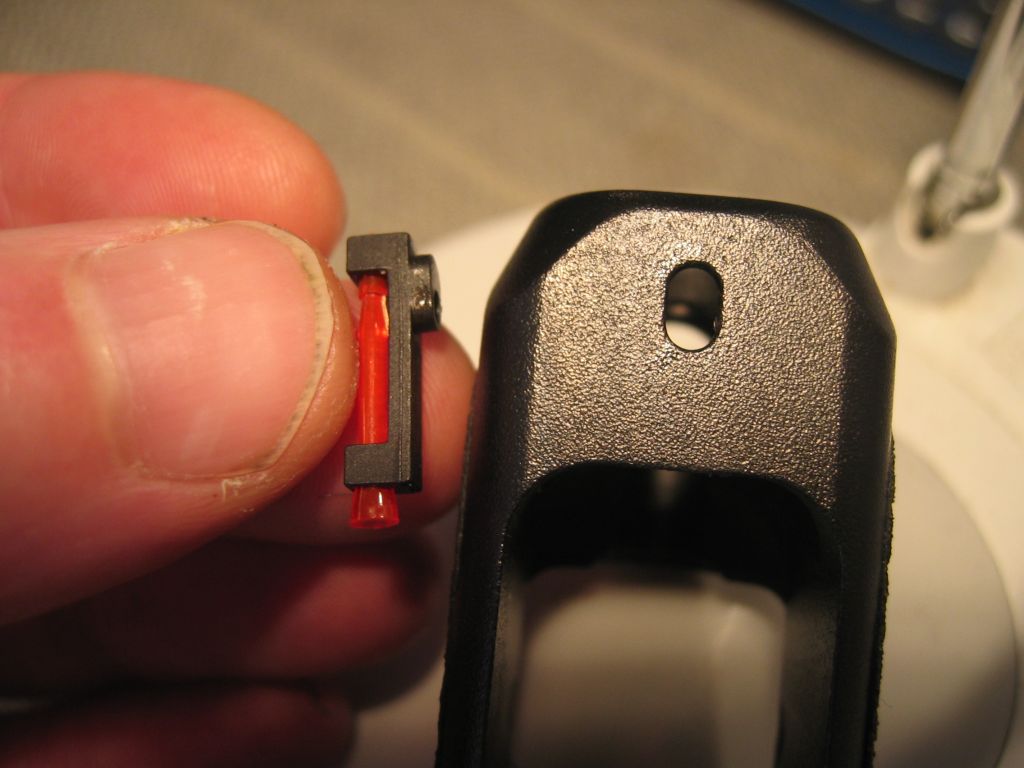
In my honest opinion, the sights on the G34 are absolute rubbish! Pure and simple. The front sight is way too fat (0.16", 4.1mm), it has a useless white dot that spoils the sight picture, and it is made in cheap flimsy plastic that will probably break at some point. Obviously I could wait for the sight to break off on its own, but I felt that a little more pro-active approach was in order 🙂
At the time, All I knew was that I wanted some sort of fiber optic sight. I didn't really have any practical experience with fiber optic sights but I felt that it was definitely worth a try – and if it didn't work out for me, I could allways tear if off again and call it an experiment that failed. I saw a few different fiber front sights on the web, but it is really kind of hard to tell from pictures how the sight would look, feel and work in reality. Then – by chance – I stumpled upon a G34 with the HiViz fiber optic sights – and even had an opportunity to test the gun out. And then the choice was simple. I really liked the large intensely glowing dots. They are way bigger and brighter than those of Dawson Precision for instance.
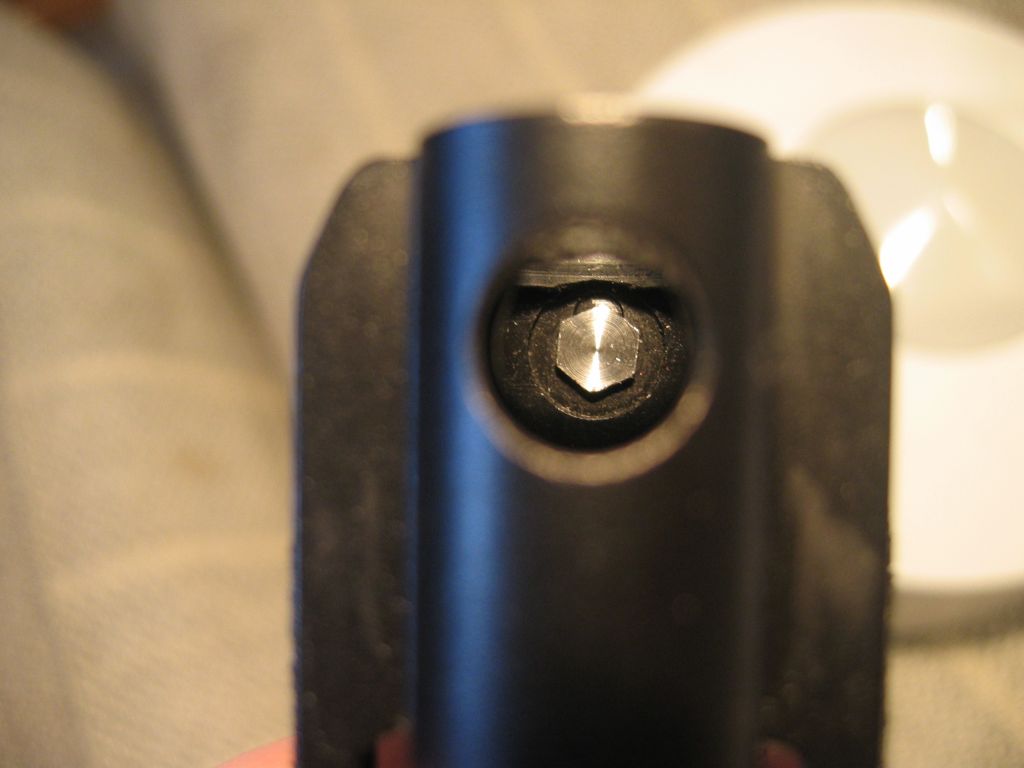
The HiViz front sight is available in two different models, one with fixed (overmoulded) fiber and one with interchangeable fiber inserts. I chose the interchangeable type (called 'HiViz PGLK'), cause I really liked the idea of being able to try out different configurations. It comes with both red and green inserts, and in three different sizes to boot (0.090", 0.110" and 0.125" fiber diameter), so experimentation is extremely easy. I currently use the red 0.090" fiber insert. The front sight post itself (which is a solid steel base by the way) is 3mm (0.11") wide, so there is a small black outline of the post visible around the dot in this configuration.
Installation…
 |
 |
Installed…
 |
 |
The front sight is available from www.hivizsights.com – or more conveniently in Denmark – from www.gunparts.dk at a very reasonable price, 260 DKK (42 USD). I can really recommend gunparts.dk. Knud Erik Poulsen has excellent service – and was kind enough to let me try his own HiViz fitted G34 before I bought the sight.
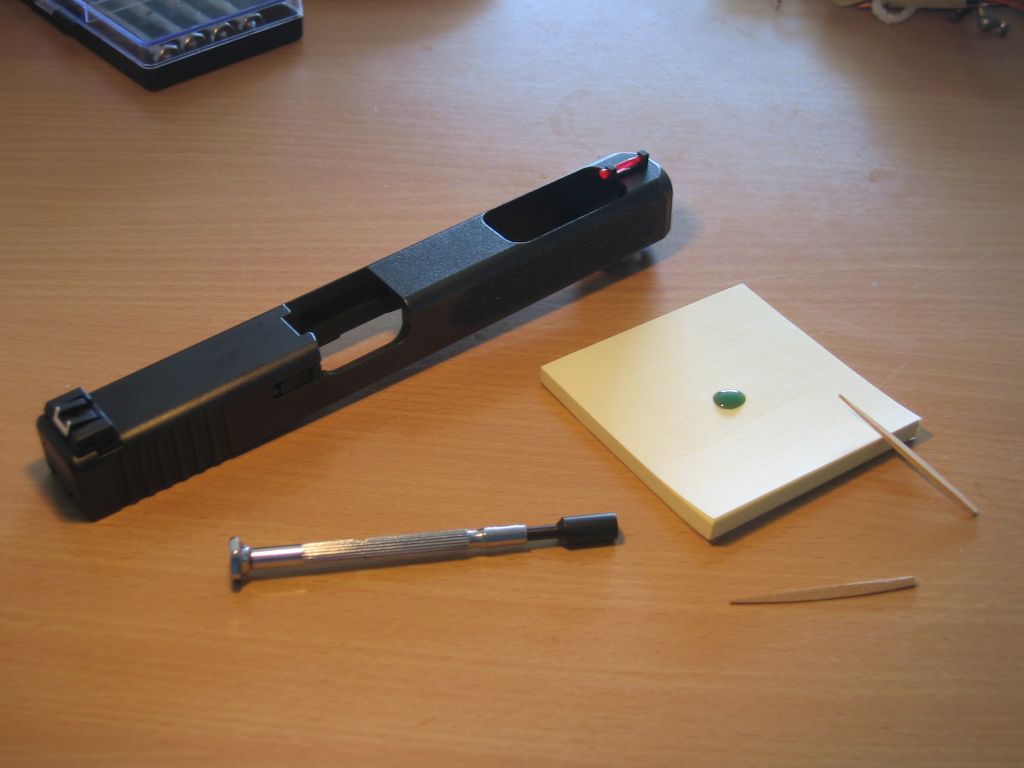
Difficulty: Easy – just be sure to have the proper hex key wrench ready to screw the sight in (long and slim, 3/16" – but you can make do with a standard metric 5mm key) as well as some green Loctite (the flexible type that can handle the shock treatment of riding the slide back and forth). Field strip the gun, break off the old sight, position the new sight in the mount hole, apply Loctite and screw in the tiny bolt through the hole in the bottom front part of the slide. Make sure it is aligned well. Total time: 15 minutes.
3) Rear Sight
The only thing worse than a G34 front sight – is a G34 rear sight. The adjustable rear has a stupid white 'U' painted around the notch and this really provides an awful sight picture with both the stock front sight and my new HiViz fiber front sight (and just about anything else I can imagine). The adjustment system has no 'clicks' but feature a very cheap, continuously variable, stepless system. It is extremely primitive and super sensitive to even the smallest fraction of a turn on the height screw. This makes it very hard to fine tune – and as if that wasn't bad enough in itself – the damn thing doesn't even stay in place when you shoot! It wanders about as it pleases while you're shooting so before long you need to readjust the rear again – which obviously is a cause of major grief in a competition where this is simple not possible!
I can not for the life of me imagine how on earth Glock felt that the adjustable G34 rear sight was an adequate solution to offer the IPSC competition shooting customers! The sight is so inferior and useless that I feel it's a downright insult! The best you can do for your Glock is without a trace of doubt to tear it off and replace it with whatever and never look back. I promise you won't regret it.
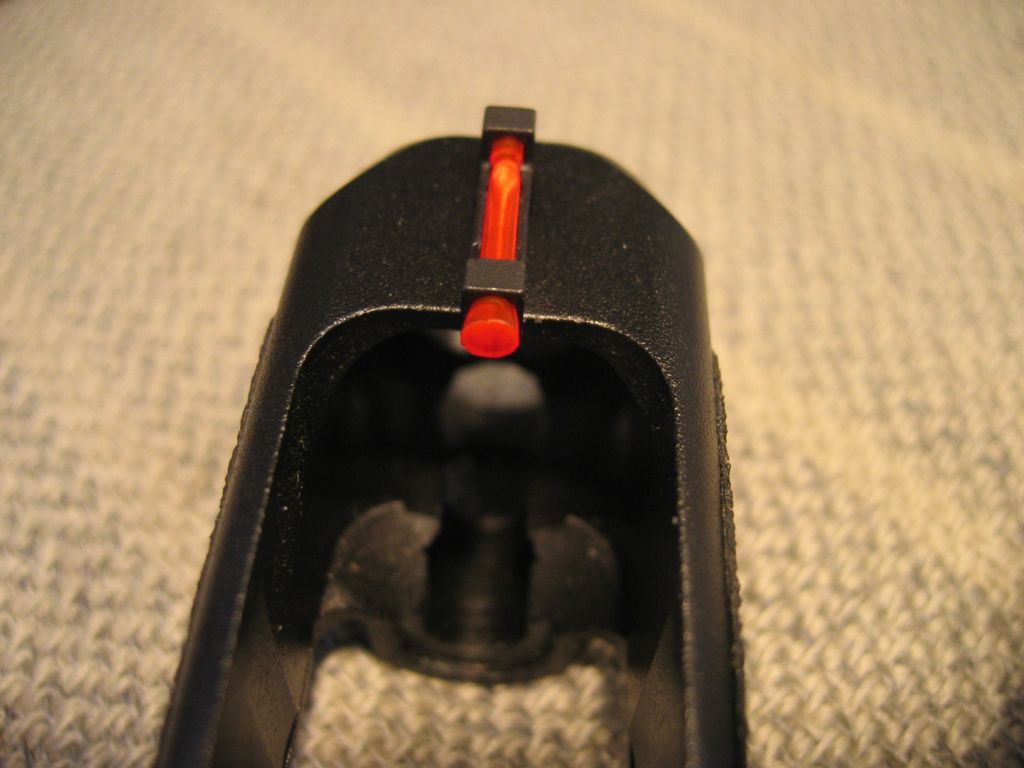
On to the new rear sight. For a long time I was quite in doubt as to whether to go for a black steel 'notch only' adjustable rear sight (such as BoMar, Heinie or Novak) or to go for the fixed HiViz rear sight that matches the front sight. The fixed rear sight can only be adjusted by squeezing it left or right (with an appropriate sight-squeezing tool) until it matches the direction the gun shoots in. The height setting can't be adjusted, so I was worried that the 'default' height setting might not match me sight picture preference and/or the ballistic curve of my favourite hand loaded rounds. I finally decided on going for the matching HiViz rear sight ('HiViz GL1005') – and boy, am I glad I did…
 |
 |
It took me less than an hour to tweak the sight, test shoot and re-tweak with the sight-squeezer until sight and mean point of impact coincided perfectly. I can now shoot with 'confidence' and its now much easier to hit on longer distances – and it is extremely fast to find a good sight picture on short to medium range with the bright dots. Also they are kind of entertaining to look at when you point the gun around on the range during the course of fire 🙂 Now shooting is never dull, due to the festive colors on the top of the slide.
With my current favourite load the point of impact is 'dead on' at up to 60 meters and the trajectory only drops about 15 cm or so on 90-100 meters. The combined sight mod works out beautifully in IPSC, especially at short to medium range where the gun seems to 'align itself' on target. It is extremely easy to see when the sights aren't properly aligned on the target. Of course I still have to work for it with targets on greater range. At great ranges I found I need to use the 'post and notch' to obtain sufficient accuracy (and I have been lucky enough to hit 'terrænpistol' targets at 100+ meters 🙂 …but at short ranges I simply bring up the bright dots on the A-zone and blast away at maximum speed.
The rear sight was obtained from www.gunparts.dk for 390 DKK (63 USD).
Difficulty: Not too hard. In fact no problem at all, as long as you've got a little bit of patience… and the right pressing (squeezing) tool. That's essential! Field strip the gun and mount the pressing tool on the slide. Use the tool to squeeze the old sight sideways out of its groove, throw the old sight as far away as you can, position the new sight in the rail and gently squeeze it in from the right to the left. I think the squeezing tool provided by Glock costs an outrageous 200+ USD (1850 DKK) :-O …but luckily my local and very friendly Glock dealer (Kristian Eriksen) had a tool he gladly lent me. You can find him at www.topguns.dk – He's extremely kind and helpful and has excellent service, so by all means, use him if you're a (Aalborg, 9-tuz local or) northern Danish IPSC shooter!
Do the mouting at the range, or bring the sight alignment tool to the range along with a bunch of your favourite ammo. Do some test shooting at medium to far range and adjust the sight accordingly. When its 'spot on' tighten the set screw to fix the sight. Total time: Around half an hour, an hour at the most.
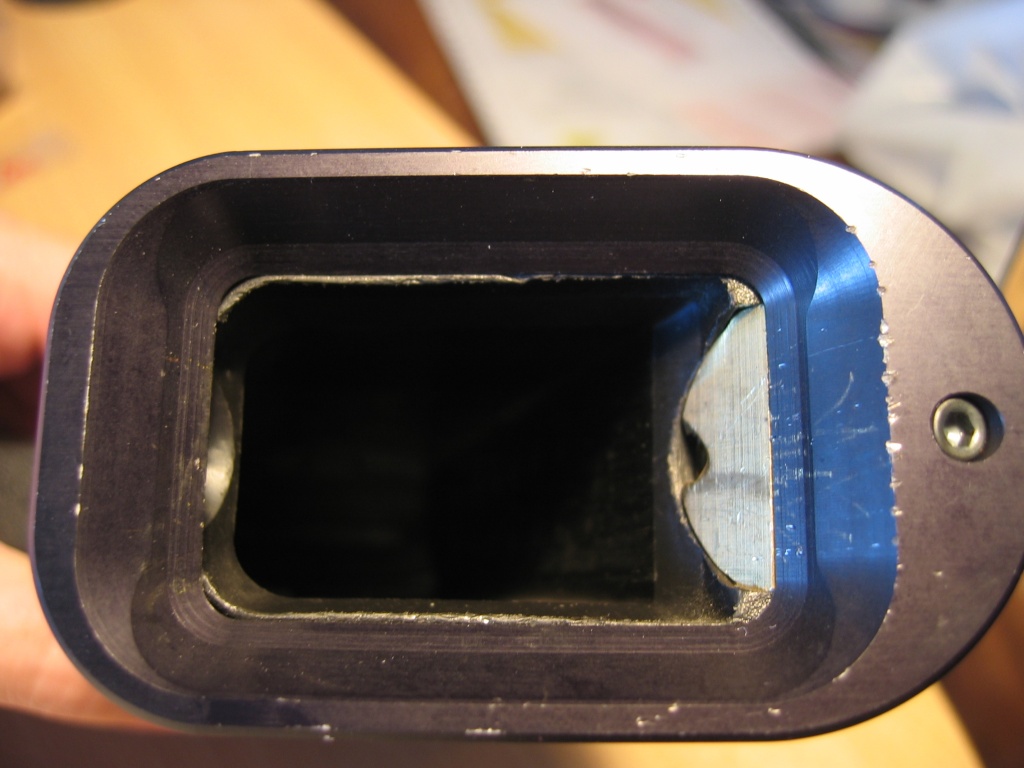
4) Added Magwell
Next I added an aluminum THE Accessories magwell. I can't really claim to hold a grudge against the original Glock design in this respect – except that the so-called 'IPSC version Glock' – the G34 – is designed and manufactured without a Nice-Fat-and-Broad magwell. Again I wonder what Glock was thinking… What is this about? How can they call this an IPSC gun? No real IPSC gun is complete without a big magwell! I suppose you could argue, that if the IPSC shooter is worth his salt he won't need a magwell to perform proper speedy reloads… To this I say "Fiddlesticks!" Even the best gun-pilot could benefit from this. A good reload will still be a good reload – but a fumbled one may automagically turn itself in to a good one with a proper magwell (and God knows that this just might occur in stressfull situations).
Oh well, the task is simple then: Find the magwell of your choice and buy it! I was a bit weary in this particular regard since I was not really sure wich mag bottoms to use at the time I looked at magwells (and obviously they need to work together, geometrically). For a long time I considered some Swedish CNC-machined aluminum +3 bottoms, but dropped the idea when I learned that the manufaturer of these bottoms used a custom magwell – and couldn't guarantee that the bottoms would work with commercially available magwells.
After a run-in with some fellow IPSC shooters at a national meeting I heard about some 'supposedly' great plastic mag bottoms and finally decided to go with a BIG alu magwell. After all – what's the point of a magwell if you cant reload with your favourite mag bottoms fitted to your mags. When looking at various magwells on the Net, I disregarded Glockmeisters (www.glockmeister.com) version and went with the THE Accessories from TopGlock (www.topglock.com) for one single reason. When I emailed Glockmeister, I got the disctinct impression that they couldn't guarantee that my 'magwell enhanced' G34 would fit in the renowned 'IPSC standard division box' without any fitting done to the magwell – Topglock did not have this reservation though. They claimed that the magwell was sure to fit the gun and sure to fit in the box!
Since I changed the sights to HiViz – which has a somewhat lower profile than the stock sight – I didn't really have any doubts left – except that the THE Accessories magwell was available in both a quite heavy (5.5 ounces, 155 grams) brass version and a lighter aluminum version! I considered this for a while but decided that my G34 was heavy enough in the 'posterior region' (read 'in the ass') so I went with the light (1 ounce, 28 grams) aluminum version.
The black anodized aluminum magwell from Topglock (item number 42274) is just beautiful. It has a truly excellent fit to the gun – like 'Hansel in Gretel'… or Gretel over Hansel to be more precise 🙂 … and with no machining required, just as promised! Also it fits nicely into my own 'IPSC standard division measurement box' – but with just about no room to spare by the way 🙂 Topglock asks 60 USD (375 DKK) for this item.
 |
 |
A cool sideeffect of adding the magwell is the fact that it complements the grip so as to provide a more 'complete' grip with support below the hand – somewhat like a .22 cal match gun with a Morini grip… Plus it looks kinda cool and race-gun like 🙂 All in all – the THE Accessories alu magwell is worth every cent! Very nice, even if I do say so myself.
By the way – you need to bring out the Dremel tool fitted with a sanding wheel to remove some plastic from the stock magazine 'doorway'. The G34 has a nasty sharp plastic rim around the base of the grip and there's really no reason to let this 'ledge' stay and possibly obstruct a 'semi-fumbled' reload. Off it goes…
 |
 |
Difficulty: Very easy! The magwell has excellent fit and the mounting seems quite sturdy. Total time: It went on in less than 5 minutes. No problem at all. Add another 5 minutes to remove the excess plastic from the bottom of the grip. A Dremel with a drum sander, or even just a scalpel, will do the trick.
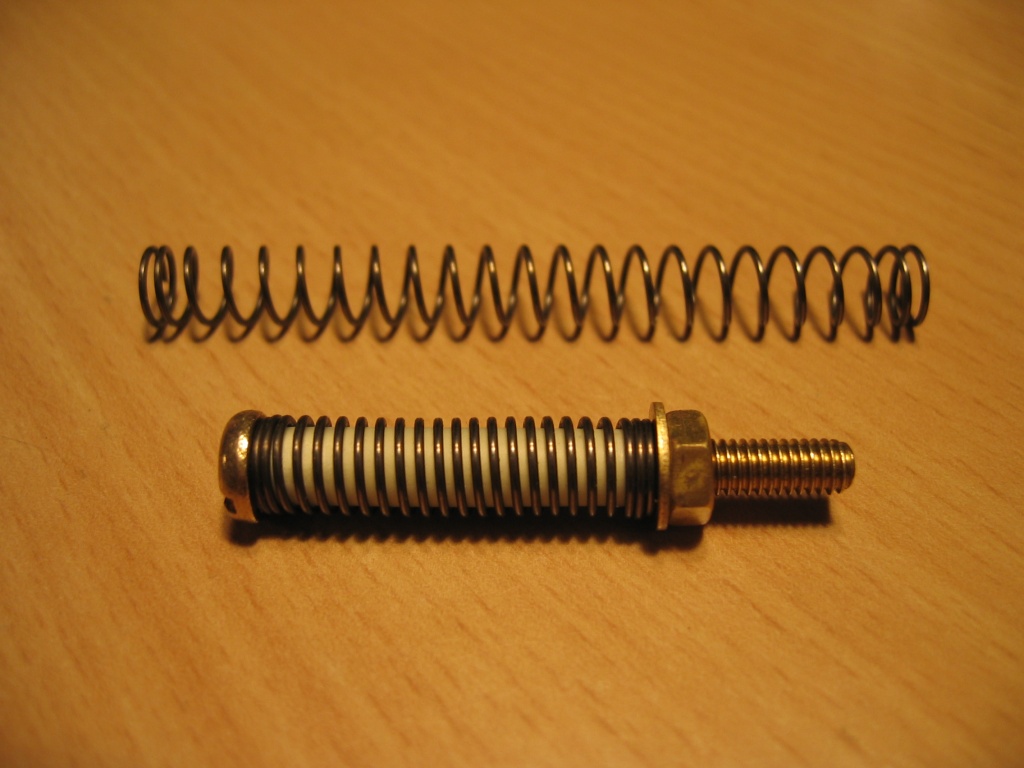
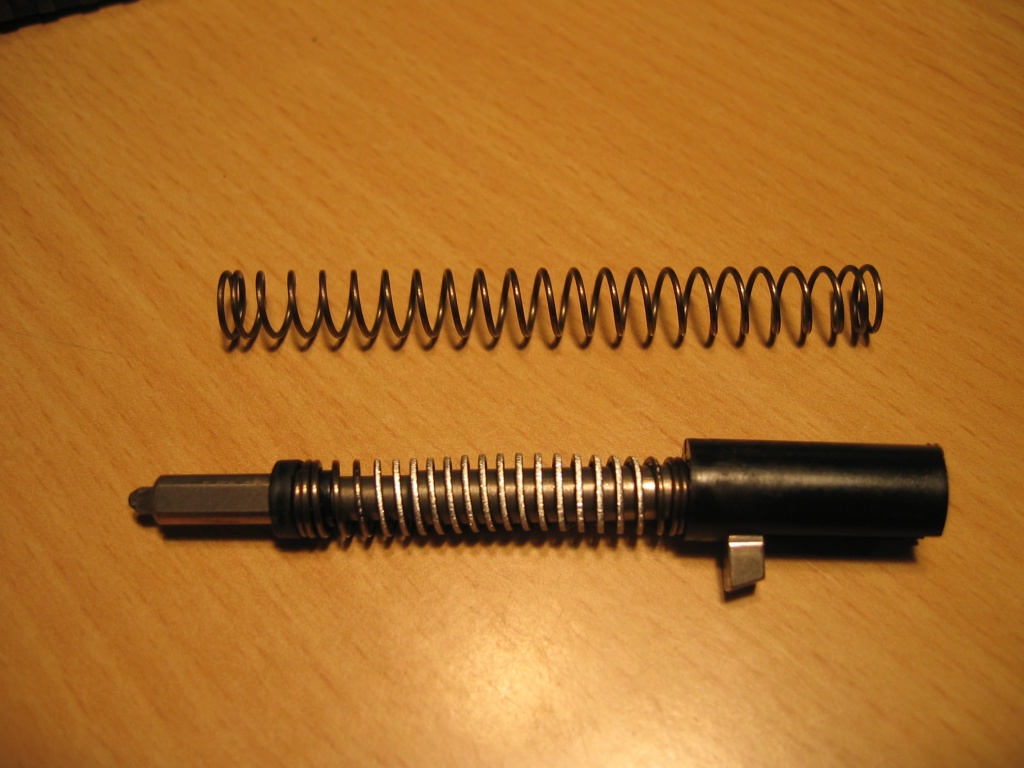
5) Changed Guide Rod
The G34 is very lightweight. Only about 650 grams (unloaded, unaltered, unmodified). It also features a very light front end. This means that the gun has a somewhat brisk muzzle flip compared to that of a heavier steel gun. On the other hand, the soft polymer frame flexes a bit and "cushions" some of the blow so this gives a lower perceived recoil. The light weight means that controlling recoil and muzzle flip is a task left to the shooter – There's no heavy nose to keep it calm when you're shooting. To inexperienced shooters it'll certainly feel 'alive' when you first pick up the gun and give it a go. That's not really a big problem, once you realize that it's simply up to the shooter to dominate it! Show it who's boss 🙂 Grip it firmly and force it into submission. No insurmountable problem – all is really takes is a few thousand rounds 'through the wrist'.
Part of the reason the G34 is so light in the nose is the guide rod and the 'window' in the slide. I believe the window was introduced to keep the weight of the G34 slide ('longslide' model) down to the same level as the standard G17, thus enabling re-use of the same recoil spring (and obviating the need for a another version with different spring force). Now this may seem like a 'quick and dirty hack' (and for all I know it just might be) – but reducing weight in the slide is a good thing in my book! I would like as little inertial mass as possible to move back and forth when shooting. Since the Glock polymer frame contributes little to front end weight, this leaves only the barrel (which is sort of semi-stationary, at least) and the guide rod. Now the barrel is among the most flimsy 9mm barrels I've seen so weight contribution from that part is limited (I guess Glock designed it this way to keep the weight down on what was originally purely a service/carry weapon …luckily, the barrels are rumored to be very tough and durable – despite being inky-dinky thin). This leaves only the guide rod.
And what a guide rod. The stock rod is made of plastic(!) and weighs a measly 2 grams. What the "!#$¤%&" is that supposed to be, using a plastic rod instead of a steel rod in a so-called IPSC specific competition gun?!? Where you need fast recovery after shots? Again, I feel the Glock designers kind of took a major dump on their customers. I mean – OK, it'll work, but it's not exactly something that brings tears of joy to the Glock pilot when he scrutinizes the "fine craftsmanship and material choice" of his gun. Why the Hell did Glock have to implement their so-called practical competition gun with just about the cheapest materials available in every single aspect? Oh well – I guess this is yet another tribute to 'adjustability of modular design'… Change it!
OK – now the only thing you need to do is decide on either using a steel rod (don't do that – way to 'low brow' technology, the density of steel is just 7.84 g/ccm) or whether to go for the 'sure thing', a tungsten guide rod (the density of tungsten is 18.82 g/ccm, much better than steel) or if you feel like experimenting with fancy new stuf like for instance the 'Harts Recoil Reducer' (a mercury filled tube with steel balls which supposedly acts as a recoil buffer – much like an oil-based shock absorber in a car – due to the interaction of the liquid and the balls) or perhaps the 'DPM Magnetomechanical Recoil System' (which uses a combination of magnets and no less than three different springs to taylor the total spring force as function of slide travel). I decided against the Harts system since it would be lighter than tungsten (mercuri has a density of 13.57 g/ccm – and this only makes up for part of the guide rod – the rest is just steel) and since it contained a nasty (very toxic) liquid which would mess up the gun in the unlikely event that it broke (I admit the risk is tiny, but it still is there)… By the way – these considerations should make it painstakingly clear that a 'titanium guide rod' (such as those provided by Lightning Strike Products) makes for a rather ridiculous 'competition improvement' (titanium has a density of 4.5 g/ccm).
After some consideration, I went with the THE Accessories guide rod from TopGlock. Note that the original captured guide rod and recoil spring 'stops short' of the G34 frame/slide (it fits flush with the nose of a G17 though – remember how the G34 slide and recoil spring is probably little more than a 'rework' of the G17) – so to maximise the benefit of the replacement part you want the 'full length' extended guide rod (Topglock item number 42286) which is only available in a non-captured version (This is no problem at all, it simply makes it easier to change the recoil spring). The extended tungsten guide rod from TopGlock weighs 45.3 grams and will cost you 50 USD (310 DKK). By the way – If you are concerned with possible excessive wear on the tungsten rod, fear not. THE Accessories has a lifetime warrenty (according to Matt from Custom Glock Racing).
 |
 |
The extended tungsten guide rod really improves the balance of the gun, especially combined with the magwell I added. It feels very 'right' in the hand somehow. It performs as expected – it reduces muzzle flip and makes it easier to re-acquire sights for that follow-up shot you want to blast after the first one. It's a somewhat subtle change in muzzle flip though – apparently I already did have some level of gun control 🙂 At the moment, muzzle flip is (of course) nowhere near as significant or pronounced as it was when I first got the gun.
Difficulty: It's a no-brainer. Honestly. It takes about the time of a 'field strip and subsequent reassembling' to install the new guide rod. This of course requires that you've also got the recoil spring you want to use with the guide rod. Total time: Less than a minute.
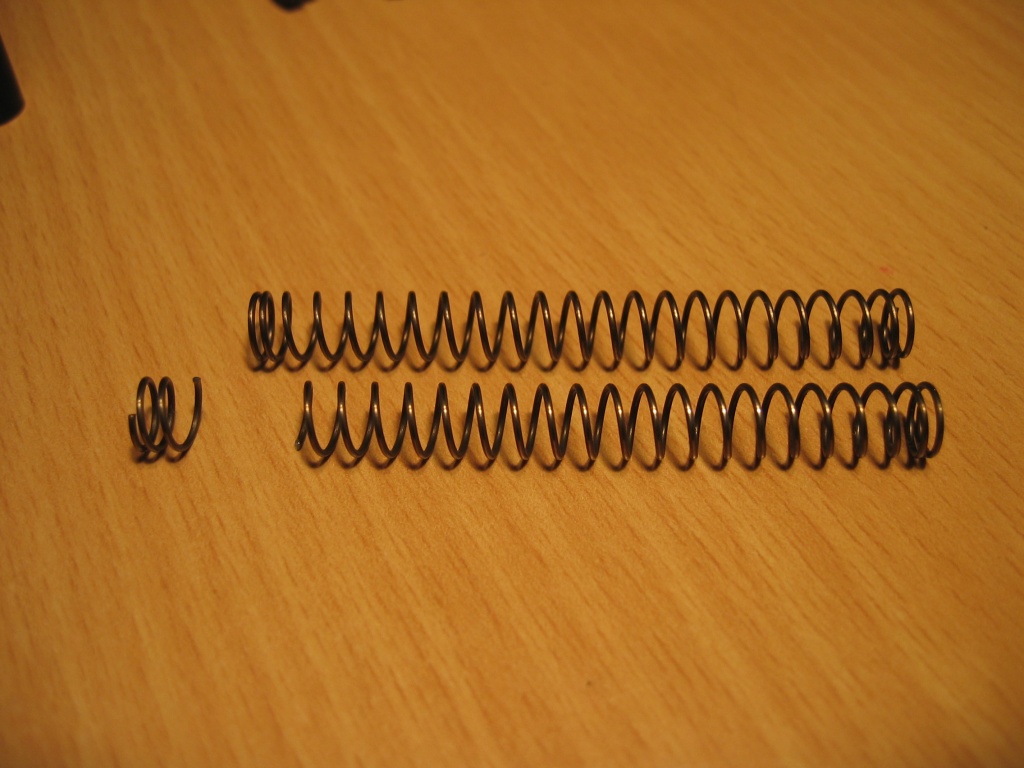
6) Changed Recoil Spring
So – now that we've got the guide rod down, lets focus on the recoil spring. You'll want it lighter because the lighter it is the sooner the slide starts moving after the shot is fired. The early rearwards motion keeps the muzzle flip 'nice flat and low'. The recoil impulse is absorbed and accumulated by the recoil spring before the recoil excerts enough force on your wrist through the frame and grip to results in any significant upwards motion of the gun. The slide is returned to its forward position without having to depress a heavy spring thus mitigating excessive energy transfer to 'raise' the gun (thereby minimizing muzzle flip). This yields a lower perceived recoil and greatly speeds up the target re-acquisition process.
There is at least two ways to go about this. You can clip coils from the existing spring or replace it with a spring with lower spring force. I did both. The stock recoil spring is rated at 17 lbs. I now use a 13 lbs spring. Inspired by Matt from Custom Glock Racing I also cut the spring, removing 5 coils. Naturally, as a result thereof the effective spring force is now quite low (how low I don't know).
A word of caution might be in order. You don't want a too light recoil spring. This is not so much a problem (as one might think) due to 'frame battering' as would occur in a xx11 style gun – but more because you might experience problems with doubling (the gun firing twice when you pull the trigger once!). This is the behaviour of an 'unsafe gun' so obviously you don't want that.
A third way to achieve the recoil spring force you want is to modify a heavy spring (such as the stock or perhaps a 15 lbs spring) in a different manner than just clipping coils (which, honestly, is a rather primitive approach). This is a trick from USPSA (United States Practical Shooting Association) master, and most winning GSSF (Glock Sport Shooting Foundation) competitor ever, Dale Rhea. The Idea is to mount the spring on a captured guide rod and mount the whole recoil spring assembly in an electric drill, rotate the spring while pressing some sort of abrasive (sandpaper, file or stone) against the spring, concentrating on the center spring area – with the object of creating an hour-glas like shape (which results in a soft spring force in the middle, full force in the ends while retaining the original outer spring diameter at the ends for smooth problem free action when mounted in the gun). This way the spring characteristics will resemble that of a progressive spring (sort of like the STI dual-spring Recoil Master buffer system which is popular for steel guns). As of now I've yet to try this spring modification out.
My 'weak and shortened' spring works out fine for the moment. It feels and seems like the recoil 'force' has been reduced – even though I know this is not the case (as dictated by the law of impulse preservation). It simply feels like the recoil 'thrust' is lower because the recoil force is distributed differently over time. By the way – these considerations should serve to illustrate how the heavier recoil spring might not be the best way to go for competition use (heavier means more perceived recoil – given the same load of course).
The lightened recoil spring modification turns out to have a nice side effect. People who used to have problems limp wristing the gun (which causes the slide to lock up – resulting in feed errors) can now experience proper slide action when shooting the gun. I imagine the gun can shoot less powerful loads as well (though why would I want to do that? – I need to stay above the 'minor power factor' requirement).
I use ISMI 13 lbs flat wire recoil springs from TopGlock (item number 42292) – I got three for 20 USD (125 DKK). The 'flat wire' recoil springs are very nice and performs flawlessly, compressing in a nice and 'orderly' fashion along the guide rod, rather than bulging out sideways, causing unwanted friction against bordering material (frame and barrel), like ordinary springs wound from round wire with larger inner spring diameter might do. *don't worry if this is somewhat unclear at the moment. pictures will be included to show the difference*
 |
 |
Difficulty: See above. The difficulty involved in changing this spring is zero – provided you've got the non-captured guide rod on which to mount the spring. Also you need a (proper, powerfull) wire cutter to clip the number of coils you desire. A word of caution – it is easier to cut more coils than to put the loose, separated coils back on… so go easy if you don't have an exact feel for how many coils you want to remove. Total time: Depends on how many attempts you need to cut the right number of turns 🙂
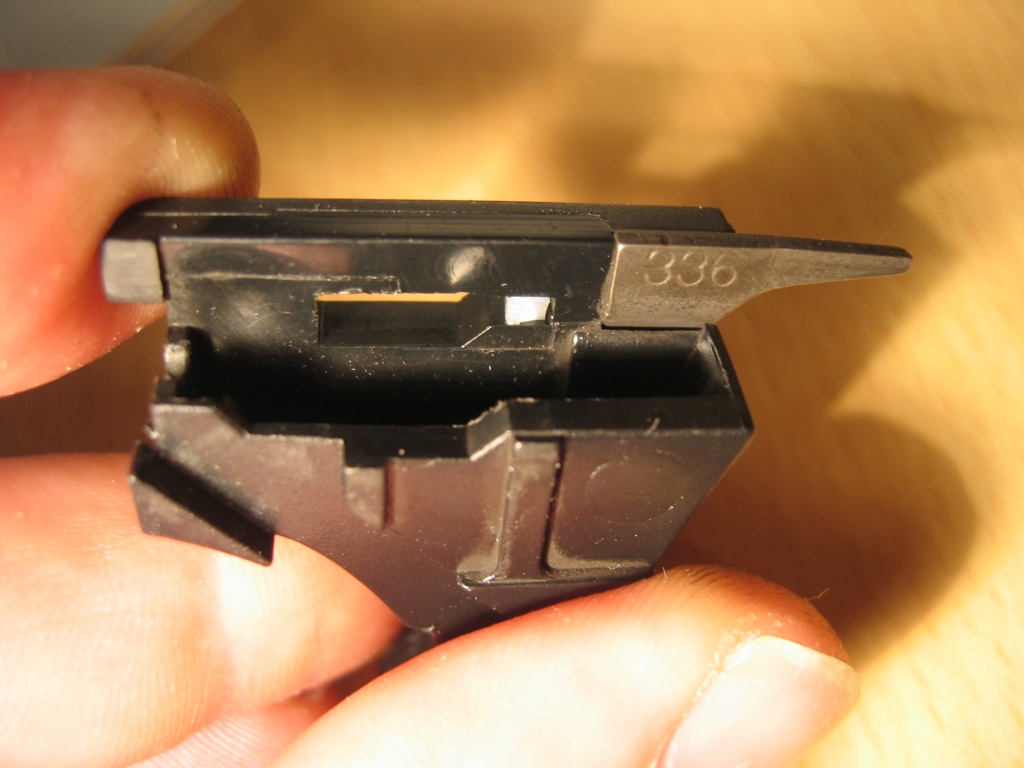
7) Changed Firing Pin Spring
Now this is interresting! This is the first modification I've done to the trigger system. And since it's a Glock this is important 🙂 I guess most people who tried using the G34 for competitive purposes would testify that the trigger could really use some Tender Love and Care! I would imagine that just about every competition Glock pilot would optimize the trigger system if they knew how to go about it – and how easy it really is. The mission – should you choose to accept it – is to dramatically lighten the trigger pull and optimize for smoother trigger break while maintaining the safety features of the gun!
The trigger mechanism is actually quite simple once you pull the gun apart and sit down for 5 minutes (Ahh OK – perhaps a little longer) and contemplate the design and the interaction between the trigger bar, connector and firing pin. Don't be mistaken though. There's quite a lot of contacting metal surfaces and these surfaces – together with the springs – determine the trigger pull 'feel'. The trigger pull weight is primarily governed by the springs, the smoothness of the trigger pull is for the most part determined by the friction between contacting parts and the state of the contacting metal surfaces. Here's a tip by the way: If you install the 'Orange Armourers Slide Cover Plate' you'll get a chance to observe the inner workings of the gun in action when you pull the trigger (on the unloaded gun!) and let the trigger mechanism do 'its thing'.
The Glock 'safe action' is really a double action trigger (at least in my book) since part of the trigger pull force goes to retract the firing pin. The firing pin spring is only partially tensioned by the rearwards motion of the slide from last shot. Since the firing pin spring is compressed by the (last part of the) 'take up' of the trigger pull, a lightened firing pin spring will result directly in a lightened trigger pull.
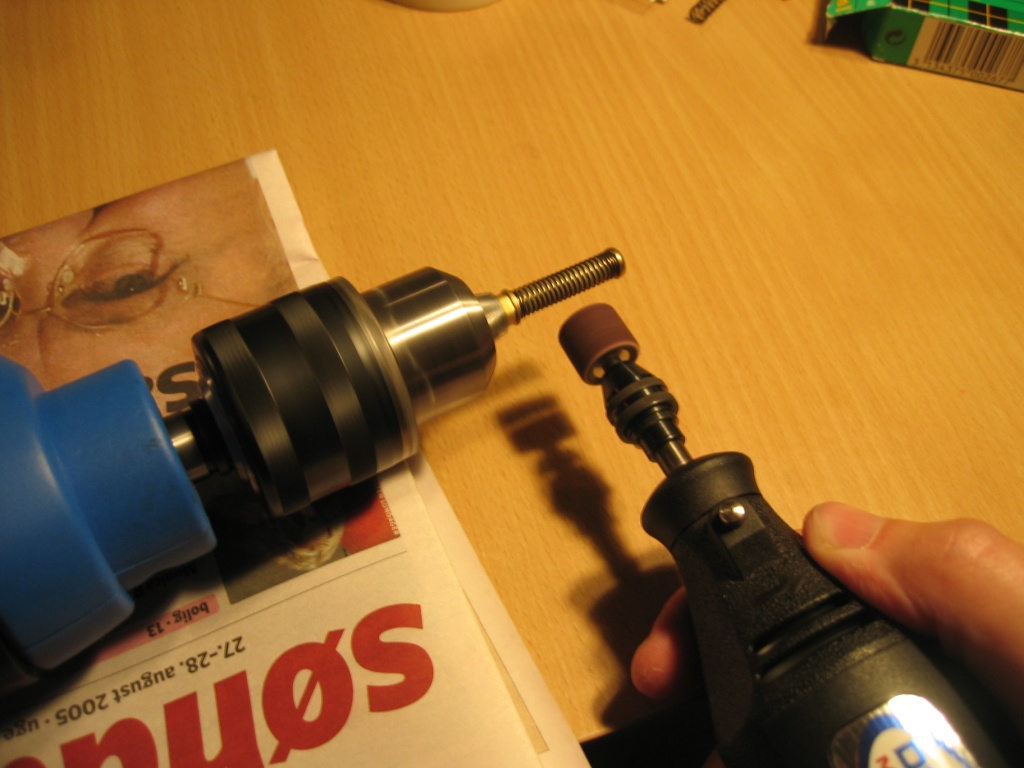
Before I started out my trigger system optimizations, I fashined a simple wooden rig to hold the gun (and guide the trigger pull gauge) to allow me to make consistent trigger pull weight measurements. I also got hold of a Lymann Digital Trigger Pull Gauge (simply an accurate strain gauge) to do the measurements. It appears to be extremely accurate, with a +/- 2 grams (+/- 0.1 oz) measuring resolution. See the 'Gear' page for further description and pictures.
Naturally I started out by measuring the stock trigger weight. Note that measurements are made at the lower part of the trigger (along the inside of the trigger guard) where I'm able to make consistent measurements (wich is rather hard to do at the non-distinct middle of the smoothly curved trigger since it pivots around the trigger end point, unlike the trigger of a xx11 gun which moves straight back). For every case I took 12 measurements, discarded the highest and lowest and derived the mean value of the remaing 10. In stock configuration my G34 turned out to measure 1930 grams (4.25 lbs).
The stock firing pin spring is rated at 5.5 lbs (according to the gun spring company W.C. Wolff). Wolff offers a 'Wolffs reduced power firing pin spring (WRPFPS) – rated at 4 lbs – for direct replacement of the stock spring. The springs are available from www.gunsprings.com for 8 USD (50 DKK) for three (numbered 16162, and oddly enough named 'reduced power striker springs').
Replacing the stock firing pin spring with the WRPFPS instantly lowered the trigger pull weight 520 grams to 1410 grams (3.11 lbs). What a nice 'trigger tuning project start' 🙂 It is very easy to feel the difference compared to the stock trigger. Needles to say, it feels much better! Things are definitely going in the right direction.
 |
 |
One obvious disadvantage of this mod is that firing pin strike energy delivered to the primer is reduced. Technically this makes the gun more primer sensitive and less reliable with hard primers. In reality this is not a problem at all. At least not to me so far. I've conducted tests with various brands of factory ammunition as well as handloaded rounds (I've tried Sellier & Bellot and CCI 500 primers – and I use 'Federal small pistol' primers at the moment) and none of them suffered from light primer strikes. And since I handload, I have the freedom to choose the primers I want – so if it had turned out to be a problem I could have switched primer brand 🙂 As a general rule, if you wan't to employ the tricks to lower the trigger pull the most, use Federal primers.
One more note. It's a good idea to use lighter firing pin springs when you switch to lighter recoil springs. In extreme cases, a very strong firing pin spring may pull the slide too hard rearwards and overpower a weak, used recoil spring – and pull the slide slightly out of battery. This in a very unsafe condition and you should take great care to avoid this.
Difficulty: The mod is really simply. Field strip the gun, remove the slide cover plate and firing pin assembly from the slide and proceed to take the firing pin assembly apart. Clean the parts replace the firing pin spring with the WRPFPS and put it all together again, and 'hey presto'. Total time: Less than 10 minutes.
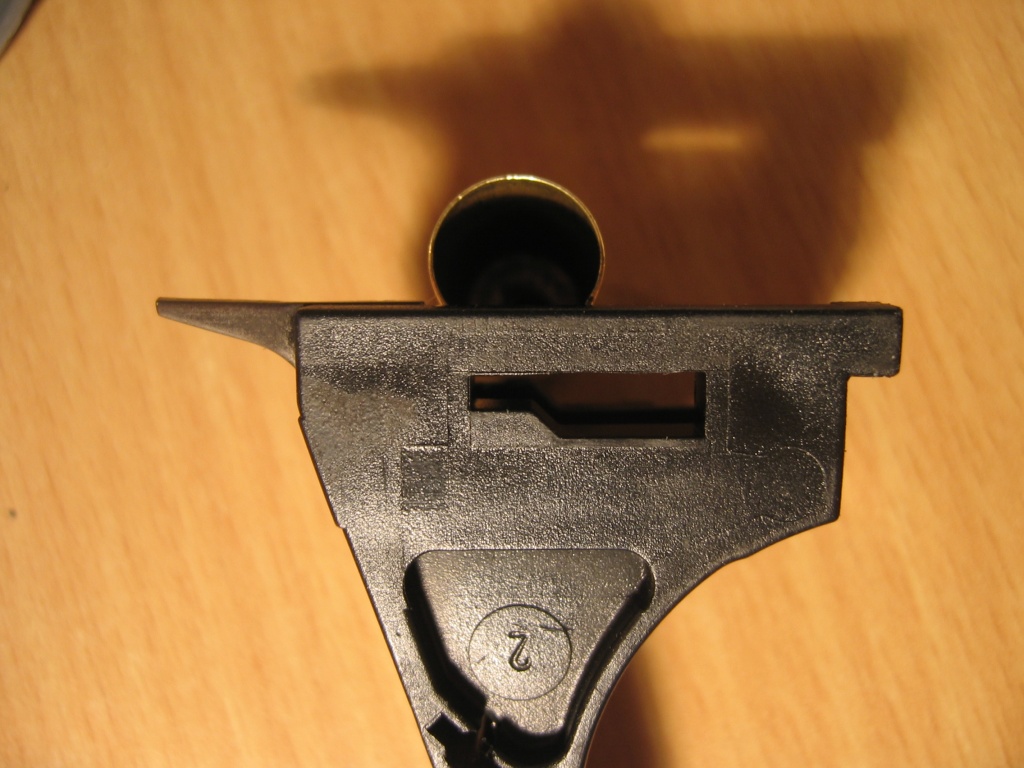
8) Changed Safety Block Plunger Spring
OK – this modification is pretty simple and straight forward. One of the three internal Glock safeties is the safety block plunger that blocks the forward movement of the firing pin unless the trigger is pulled. When the trigger is pulled, the safety block plunger is lifted up into the slide thus allowing free passage of the firing pin once the trigger bar is retracted fully.
The way this safety is implemented, an angled cam on top of the trigger bar pushes the plunger upwards when the trigger bar moves backward. In order to lift the plunger, it has to depress the safety block plunger spring – so if the plunger spring is lighter, the trigger pull is lighter.
Wolff Gunsprings offers a 'Reduced Power Safety Block Plunger Spring' (WRPSBPS) for direct replacement of the stock spring. The springs are available from www.gunsprings.com for 8 USD (50 DKK) for three (numbered 33226).
 |
 |
Replacing the stock safety block spring with the WRPSBPS lowered the trigger pull weight yet another 80 grams from 1410 grams to 1330 grams (2.93 lbs). Hooray – the 3 lbs barrier is broken 🙂 The additional trigger 'feel' difference compared to before the modification is rather subtle, however any step in the right direction counts in pursuit of the optimized Glock trigger. Luckily there's a few more tricks that can be done to the trigger…
Difficulty: Very easy. Field strip the gun, remove the slide cover plate and remove the spring tensioned piston that interacts with the extractor. Depress the safety block plunger, remove the extractor, remove the safety block plunger and replace the safety block plunger spring with the WRPSBPS. Reassemble the slide. Total time: Less than 10 minutes.
9) Changed Mag Release Catch
NB – soften this a bit…
OK, time to rant about how Glock made an obvious design blunder again… (don't worry, I promise it'll be the last for a while). The original mag release catch is nothing short of terrible. It is way to small and has extremely sharp and pointy edges, so it's hard to get at in a hurry (which coincidentially is how most mag changes are made in IPSC… in a hurry) and it really digs into my left support hand when I get a high-and-proper grip. I don't consinder my hands freakishly big, so I can imagine a lot of Glock pilots will experience the same.
Oh well. This too can be fixed. I purchased a THE Accessories 'Black Aluminum Extended Magazine Release' (Small fit, Straight serrations) from TopGlock (item number) for 28 USD (170 DKK). The extended mag release has two small threaded holes, so it can be fitted with pretty much any 'button' you'd like.
 |
 |
The extended mag release works wery nicely. It is easily accessible, more than twice as big as the original, and it has nice rounded corners… but it turned out that I needed a few practice sessions for my hands to get accustomed with the bigger 'knob' so as not to accidentially depress it and dump the mag during a course of fire. Ahem… the less said about this, the better 🙂
Difficulty: Not too bad. It takes a bit of fiddling with a screw driver or some such precision instrument to pry out the leaf spring from a groove in the stock mag release. Just field strip the gun and you can access the spring from above, looking down the mag opening. Once you got the spring free, the mag release drops right out. The replacement slides in the same way and you pry the leaf spring back in its place. Total time: Less than 10 minutes.
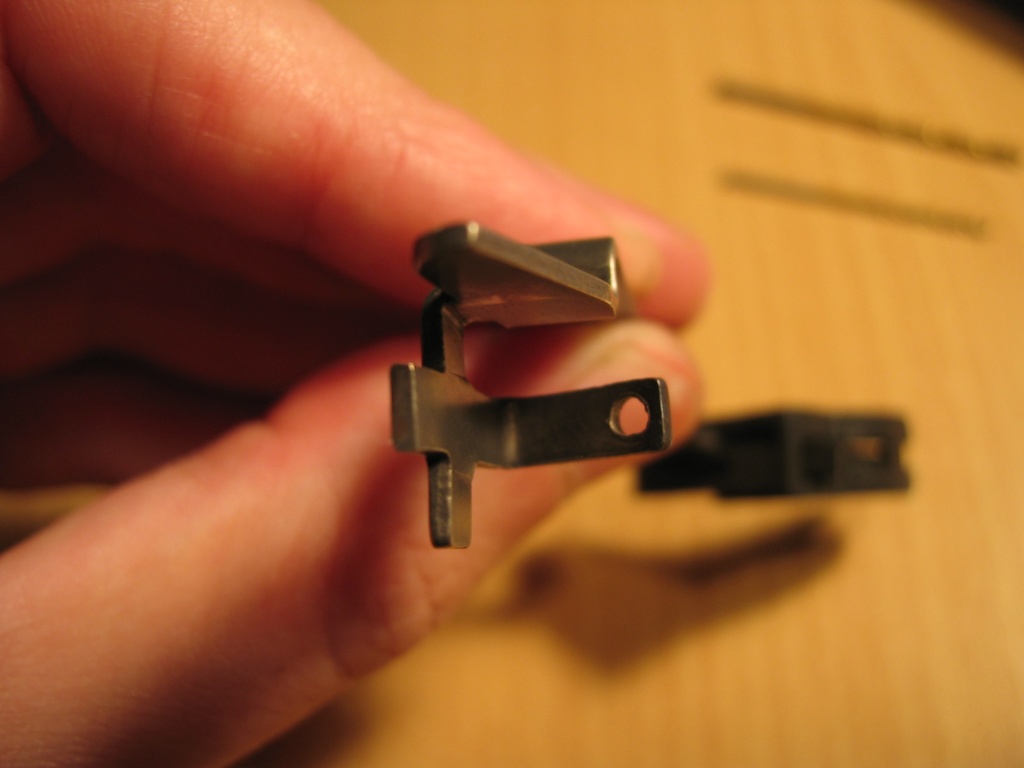
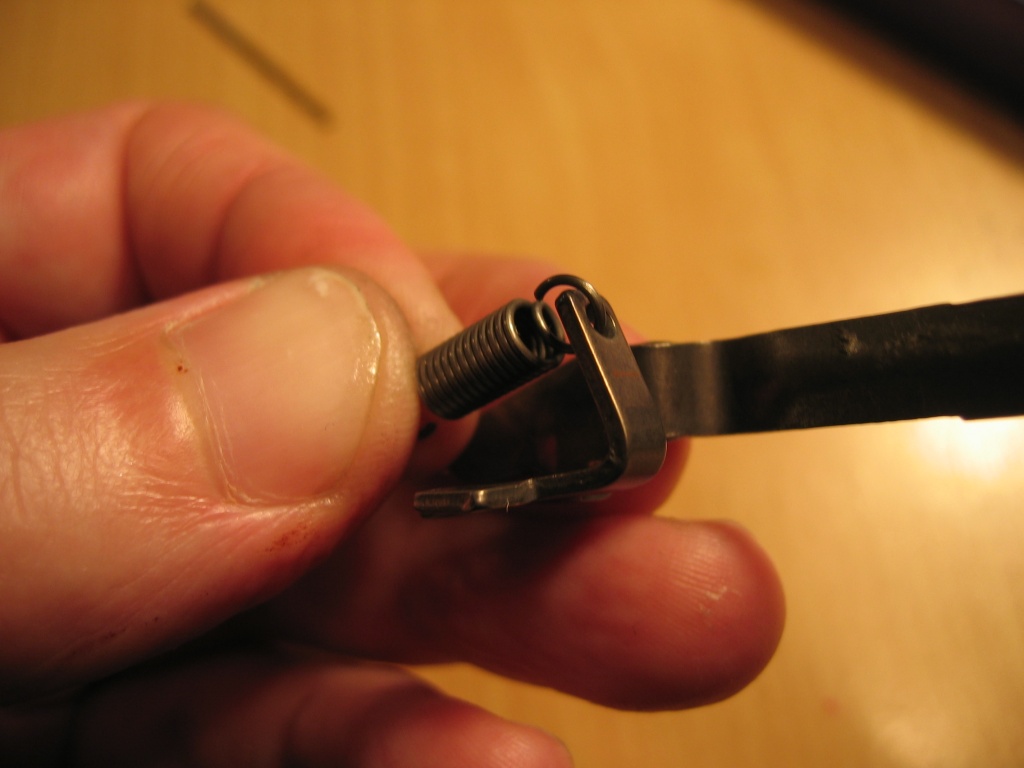
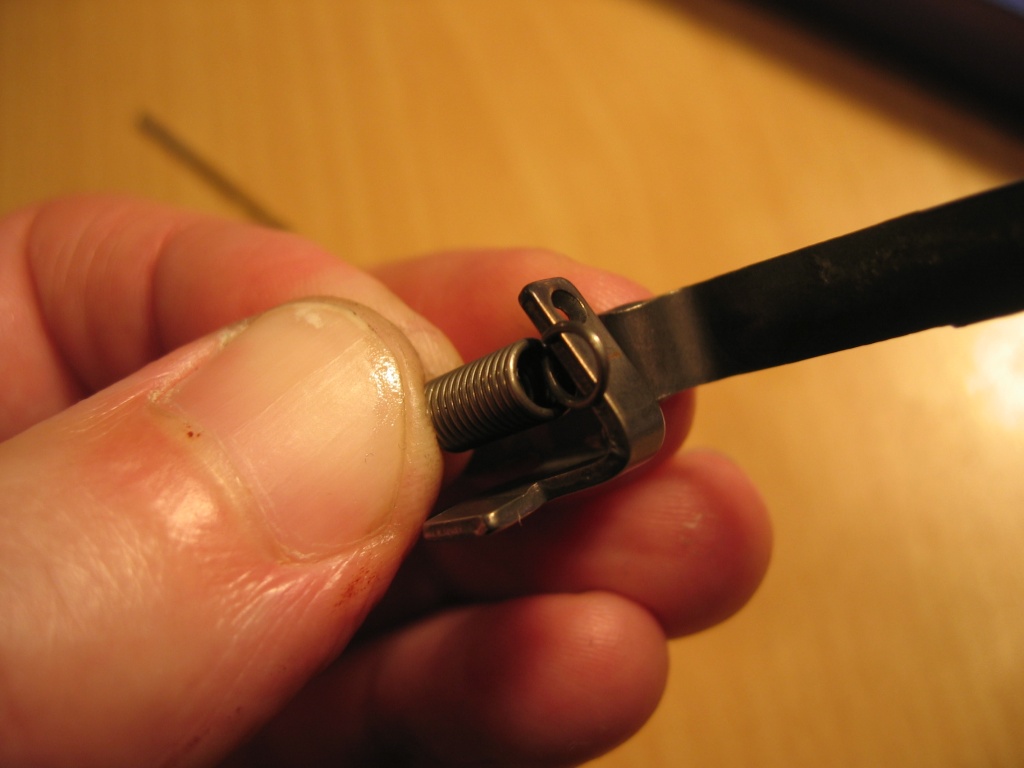
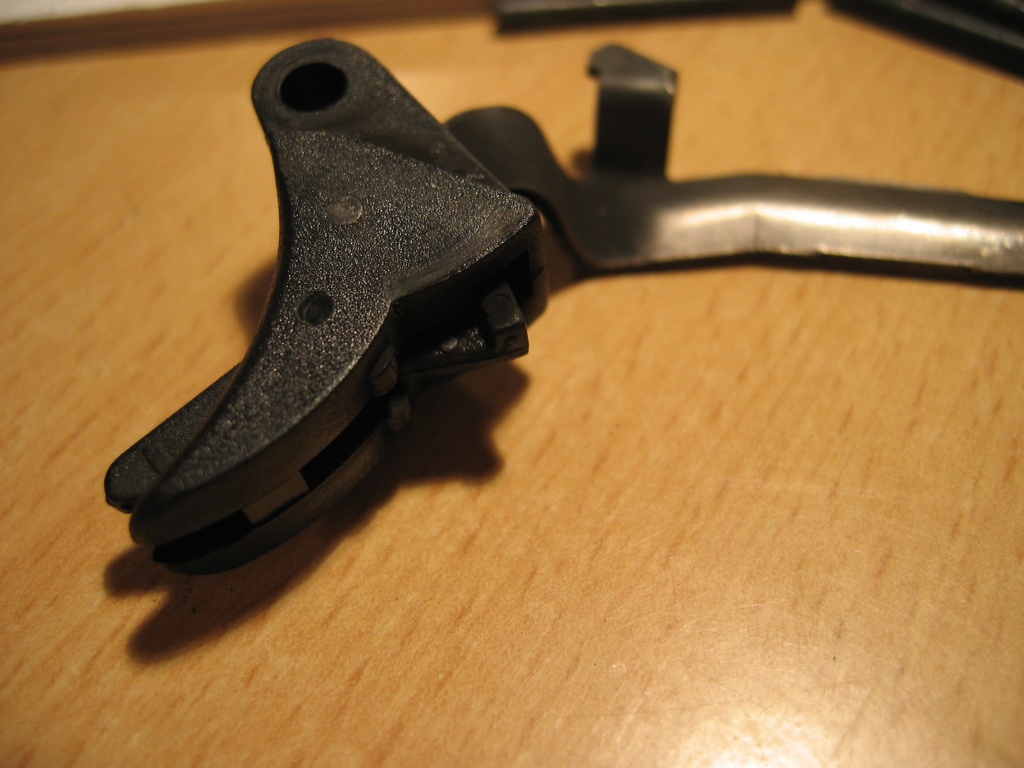
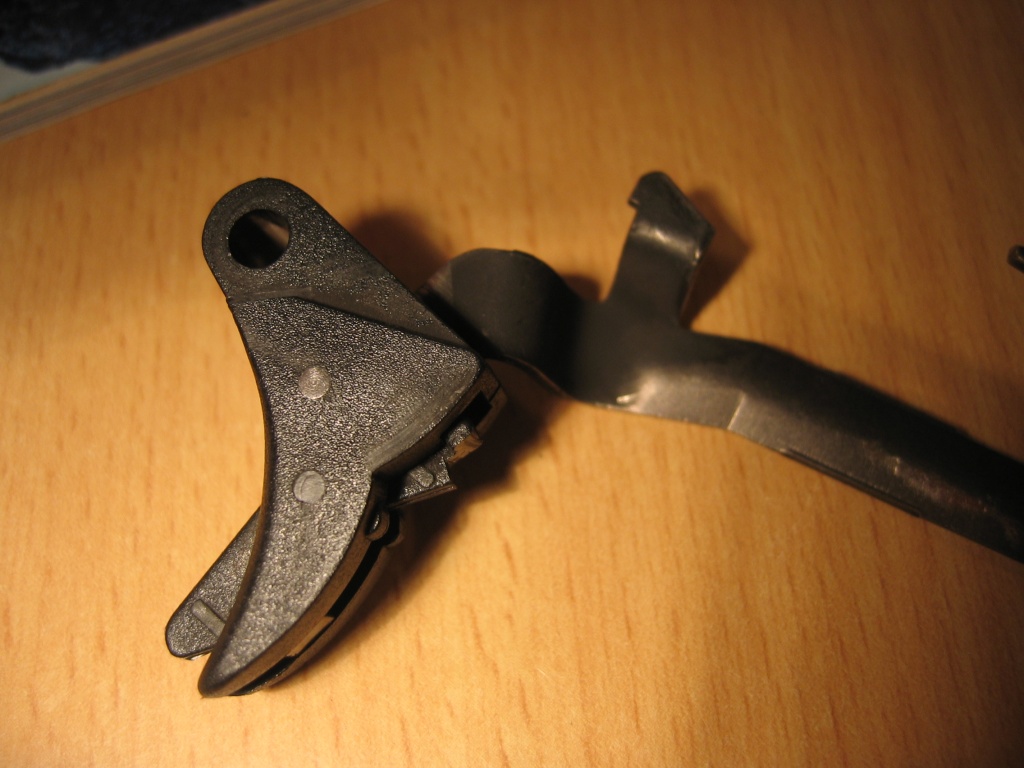
10) Trigger Spring
Now back to the trigger job. In the plastic trigger housing, the trigger spring resides. The trigger spring connects the back of the trigger housing to the 'bent' steel tab on the trigger bar, just next to the sear. The trigger spring is mounted at an angle, pulling the trigger bar rearwards and upwards, thus performing two tasks… The rearward tension offsets the firing pin spring resistance. The upward tension is used to reset the trigger bar after the trigger is pulled and the slide has cycled.
Since the trigger spring pulls in the same direction as the movement of the trigger bar when the trigger is pulled, it actually helps the trigger being pulled. Thus a stronger spring lowers the force required to pull the trigger… Simple as that. So if you want to to increase the trigger pull weight of your Glock, just buy one of the reduced power trigger spring foolishly advertised as a 'competition tuning part', though my guess is that you want to go the other way…
 |
 |
I got hold of some Wolff 'Extra Power Trigger Springs' (WEPTS) from www.gunsprings.com, three springs (item number 33221) for 8 USD (50 DKK). Installing the replacement spring is very simple as it is a direct replacement of the stock spring. Installing the WEPTS dropped the trigger pull weight another 70 grams from 1330 to 1260 grams (2.78 lbs). Yet another step in the right direction.
Difficulty: Very easy. Field strip the gun. Punch out the three pins holding the mechanical 'guts' in the receiver. Lift out the locking block and the slide stop lever. Lift out the trigger, trigger bar and trigger housing as a whole. Disassemble the trigger bar / trigger housing (which essentially means removing the trigger spring), replace the trigger spring and reasseemble. Total time: Less than 10 minutes.
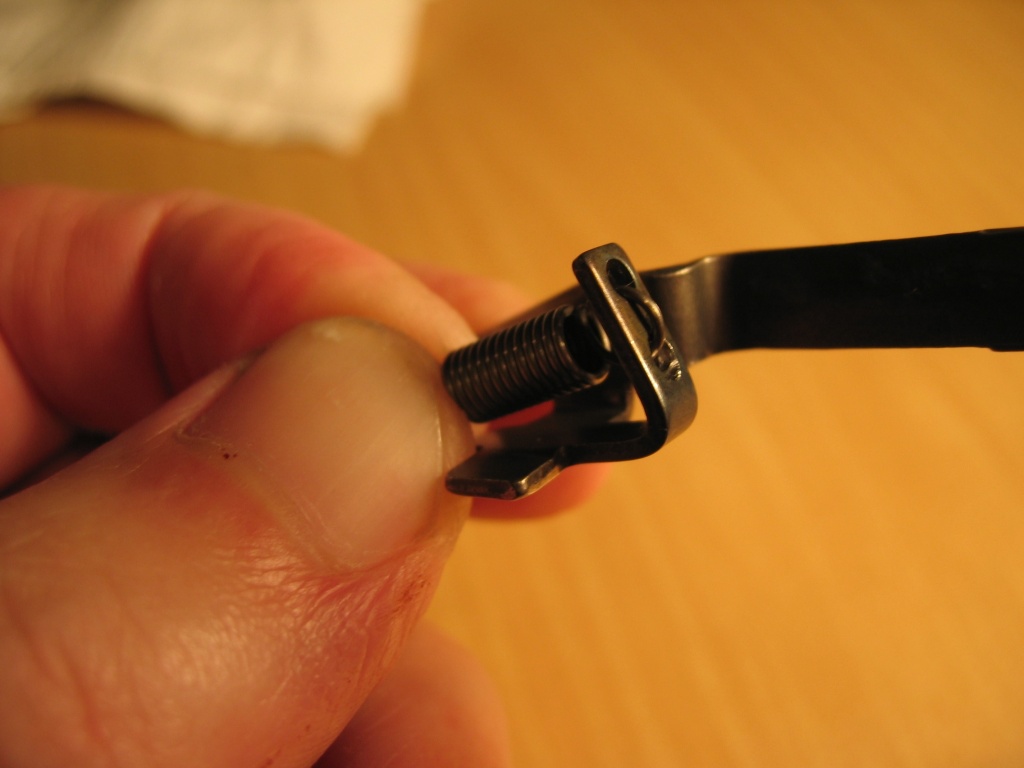
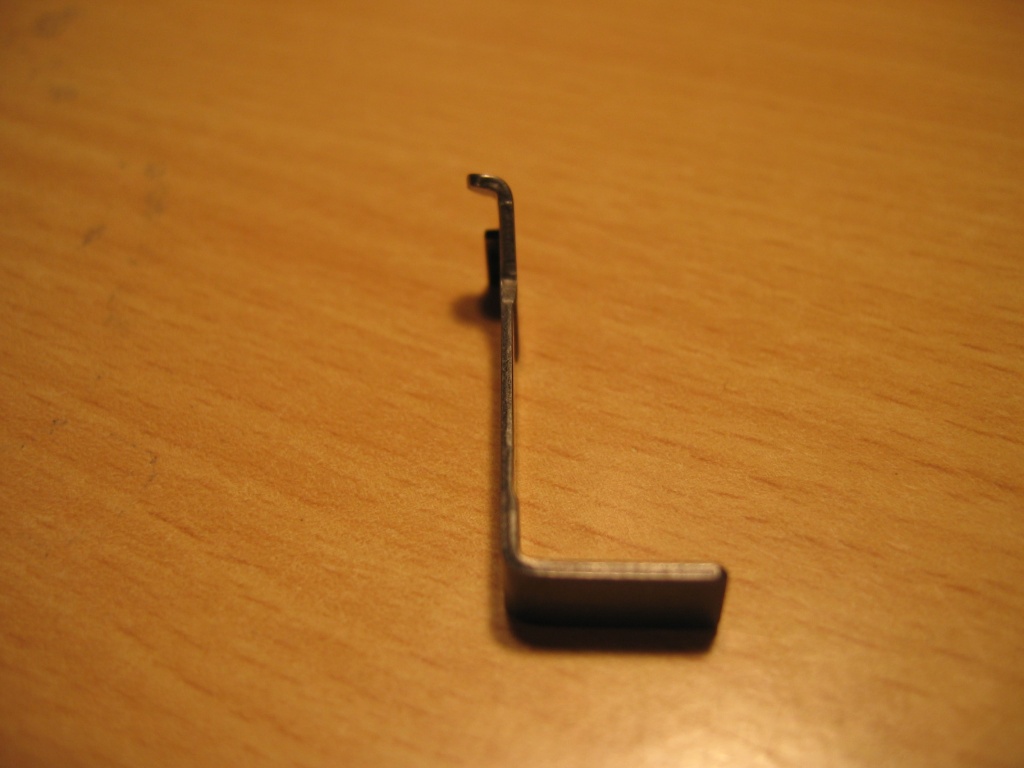
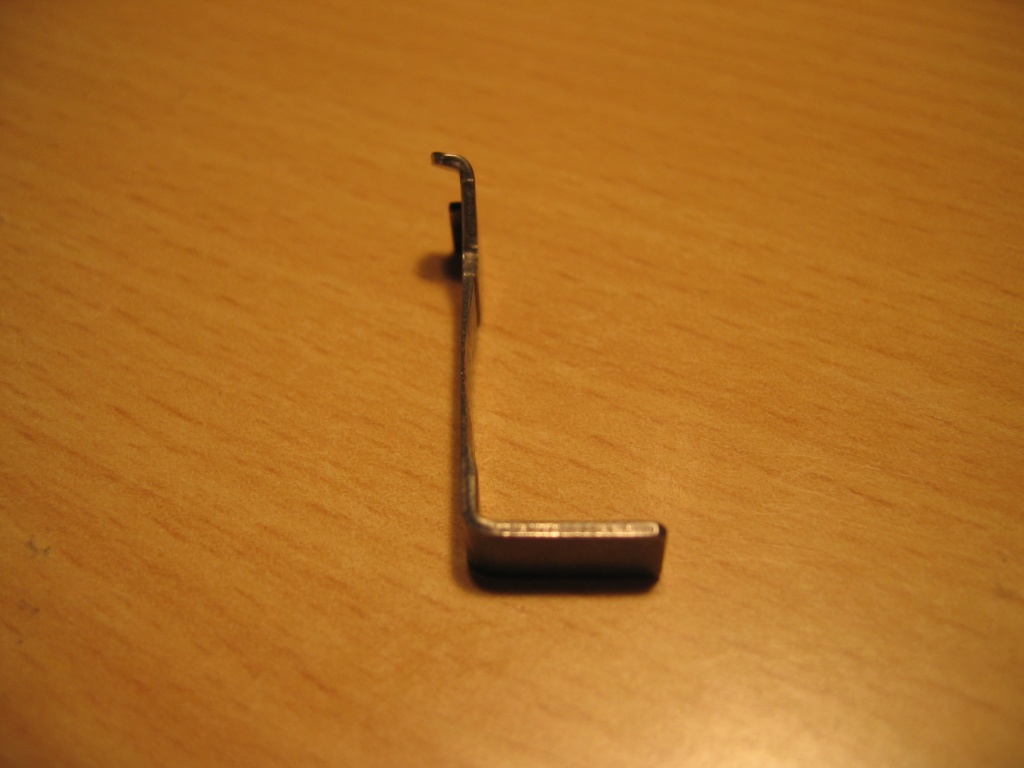
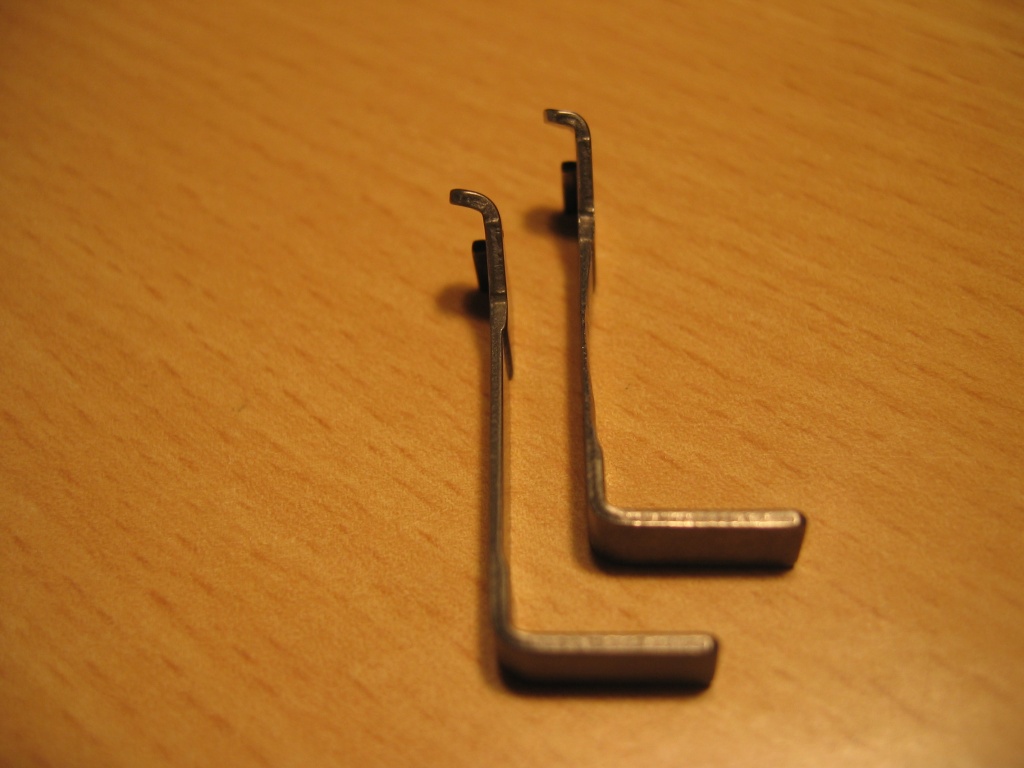
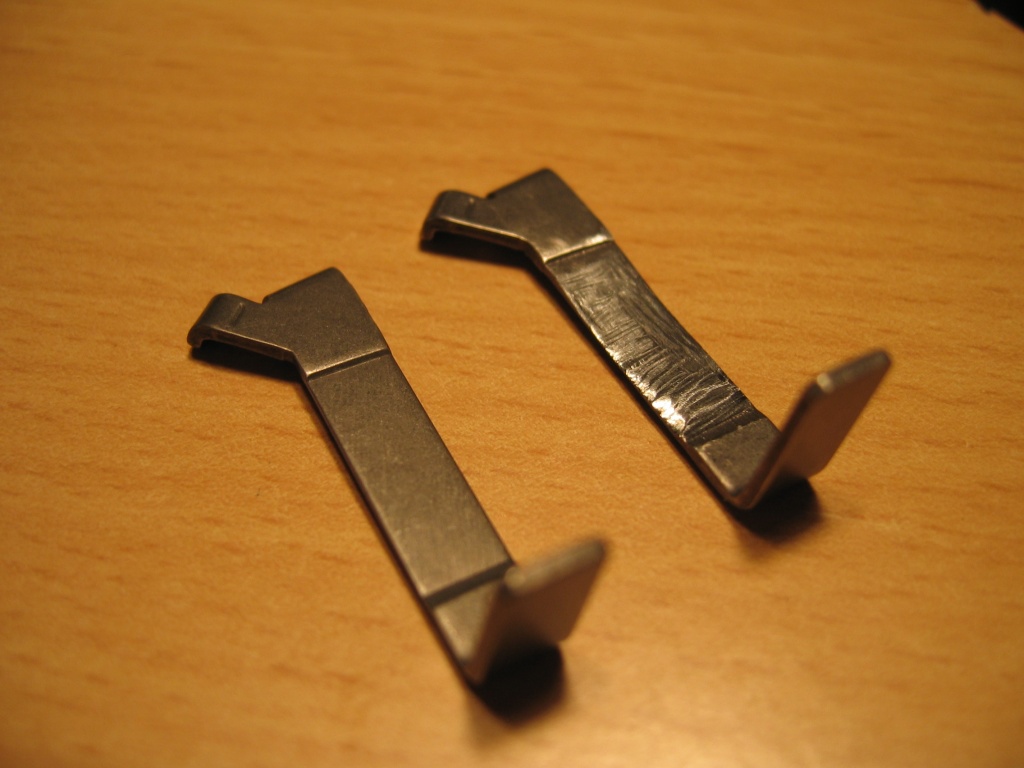
11) Trigger Spring Geometry
Note: description for the pictures will follow shortly…
 |
 |
asdf
 |
 |
asdf
 |
 |
asdf
 |
 |
asdf
 |
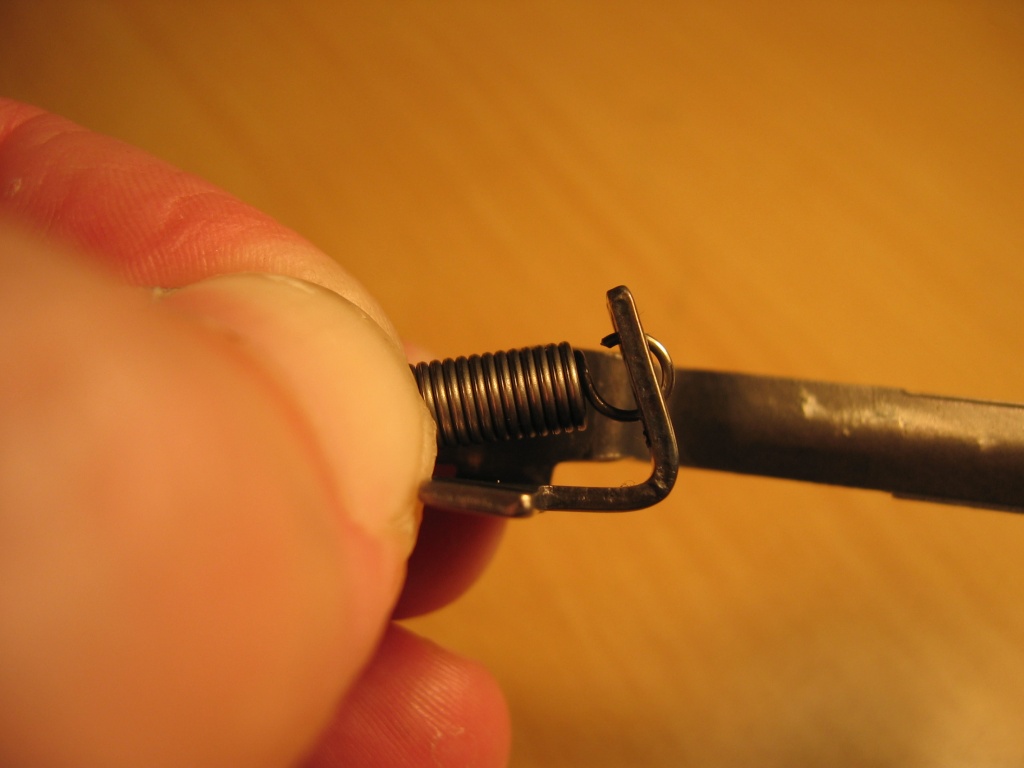 |
Dropped trigger pull weight another 180 grams from 1260 to 1080 grams (2.38 lbs)
Quite difficult! Took almost two hours to anneal and drill the steel thingy… Easy to screw up with the Dremel if you get too 'enthusiastic' and loose patience.
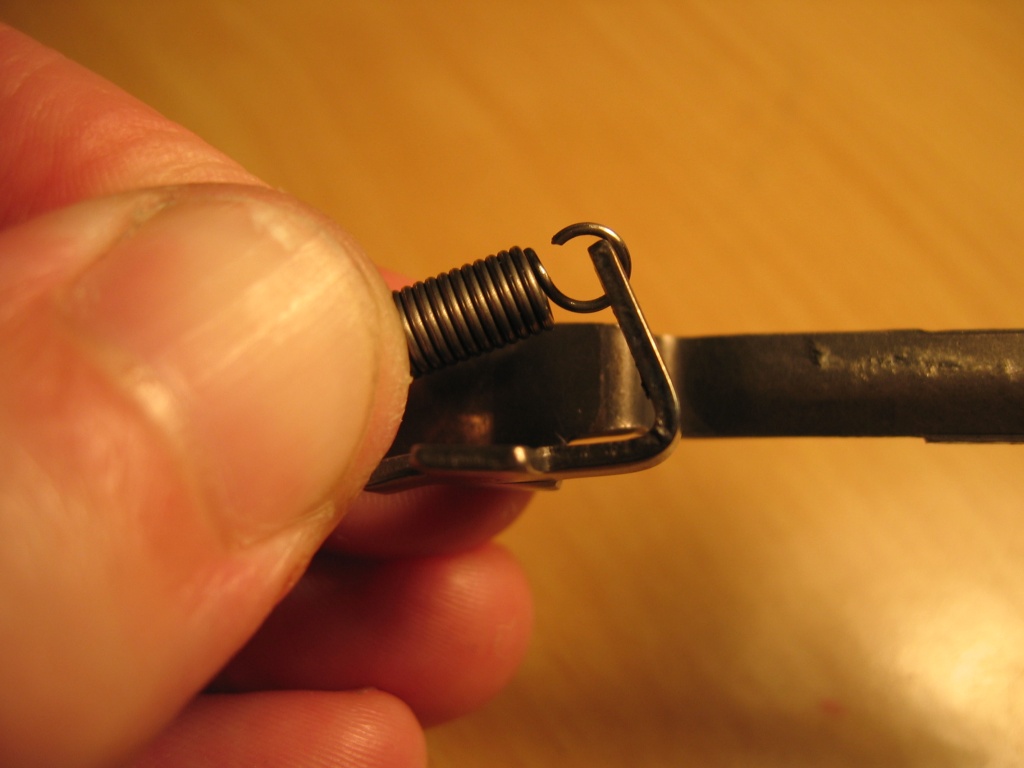
12) Thinned Down Connector
reduce friction + must still ensure proper reset of trigger
 |
 |
asdf
 |
 |
Dropped trigger pull weight another 30 grams from 1080 to 1050 grams (2.31 lbs)
No too hard with the Dremel and a drum sander. Total time: Less than half an hour.
13) Firing Pin Spring – (option 1) Cut coils
asdf
 |
 |
Dropped trigger pull weight another 160 grams from 1050 (at stage 12) to 890 grams (1.96 lbs). Hooray! – the 2 lbs barrier is broken 🙂
Requires Federal primers (I have not obtained reliable results with any other primer). Easy! Total time: Less than 10 minutes.
14) Firing Pin Spring – (option 2) Thin it down
asdf
 |
 |
asdf
 |
 |
Dropped trigger pull weight another 190 grams from 1050 (at stage 12) to 860 grams (1.90 lbs)
Requires Federal primers (I have not obtained reliable results with any other primer). A bit more tricky. A good little "rotating rig" is needed for proper control while drum sanding. Total time: Less than half an hour.
15) Reduced Trigger Take-up
asdf
 |
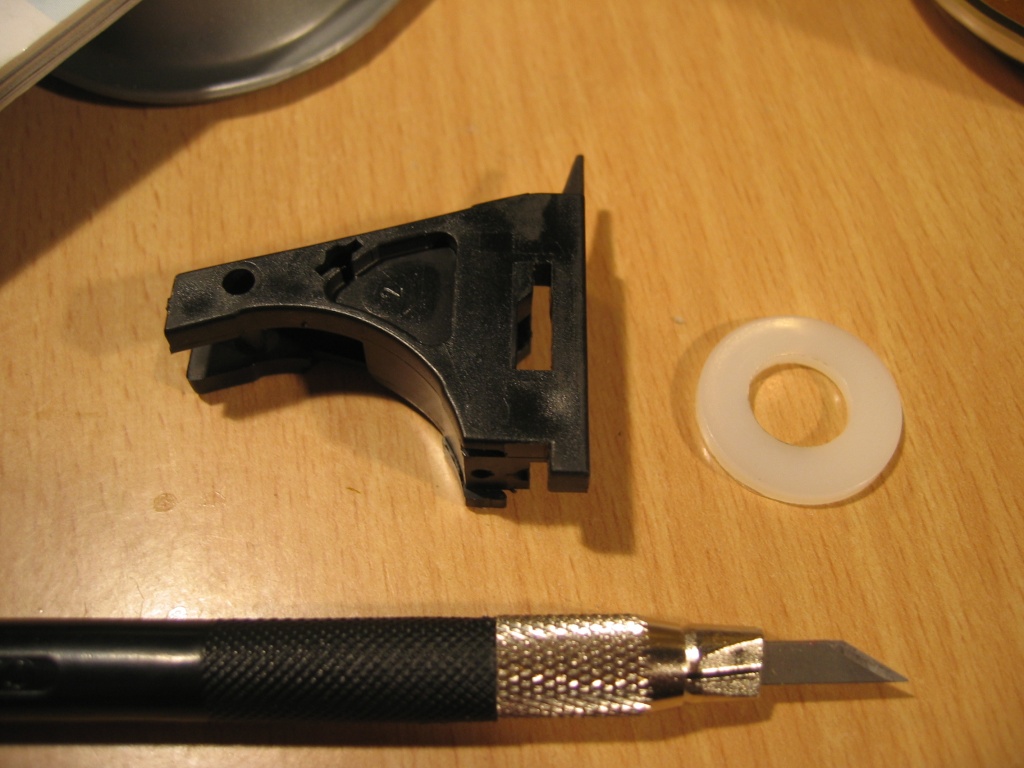 |
asdf
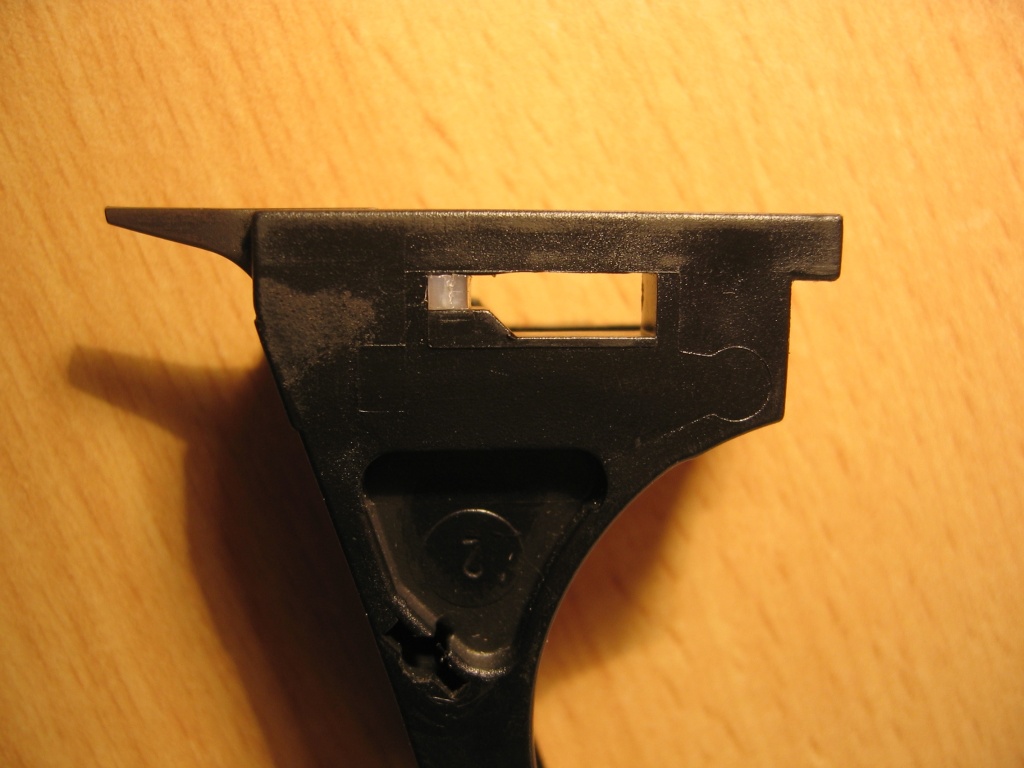 |
 |
Trigger take-up length reduced by about xx mm (measured at the bottom of the trigger)
Important – fix trigger safety to still engage properly when take-up is reduced:
 |
 |
Not too hard. Cut the plastic washer with a bit of patience. Measure a few times with a good set of sliding calipers. Cut carefully to obtain a solid "press fit". Carefully cut trigger safety to enable engagement even with reduced take-up. Total time: About 30-45 minutes including test fitting.
16) Reduced Trigger Overtravel & Reset
image x2
image x2
image x2
Trigger overtravel reduced by about xx mm (measured at the bottom of the trigger)
image x2
image x2
image x2
Again not too hard – requires more patience! Total time: About an hour (less with a bit of luck).
17) Polished Internal Parts
Results in a very nice and incredibly smooth operation. Trigger pull weight 'feels like' the 800 grams region.
image x2
A bit fiddly. Easy to screw stuff up with the Dremel and especially if the polishing compound is too abrasive. Go easy, use a lot of cottom tipped swabs. Total time: About two hours including a thorough cleaning.
Disclaimer … — …
Here's a few lines about how you've got to take on full responsibility for anything you do, including anything gun related, including performing constructive changes and/or additions to a gun, including stuff you've been inspired to do by reading this page of info-nuggets which just so happen to be about constructive changes to a particular gun 🙂
In short: The information on this page is presented for information only. I do not assume any responsibility for whatever endeavours you take upon yourself to perform. Do not blame me if you fok up your Glock or it changes behaviour in an undesired way!
A very skilled and experienced local IPSC shooter told me that "when you test fire a Glock after doing modifications to the trigger system (including anything that might affect the trigger system), you load the magazine with two to three rounds only!". If, for some reason the mods you've made causes the gun to go 'full auto', you don't want a full magazine worth of rounds spraying all over, going where-ever, causing a little additional muzzle-flip for each round! You might be too surprised by this event to handle it 'properly', and I guess that could potentially result in a 'headache' that would really ruin the day!!
If you feel that some (or all) of the mods are crazy, stupid, superfluous
…or brilliant, excellent, fantastic, phenomenal, magnificent or outrageously cool…
please don't hesitate to drop me a line on hitman -at- uckfup -dot- dk